Since starting my own 'Adventures in Sourdough' I've looked at numerous websites, blogs, and cookbooks - and even joined a Facebook group. They all talk with varying degrees of technicality about 'discard', 'hydration', 'autolyse', 'coil' or 'stretch and fold' techniques, 'bulk ferments' etc., etc. - all of which can start to look really daunting after a while. In the pursuit of 'perfection' you can also equip yourself with proofing baskets (bannetons), and a specialist dough cutting tool (lame) to make pretty designs on the top of your bread.
I've come to the conclusion that if you aren't that bothered about how your loaves look (whether you get an 'ear' or not - look it up!) - and just so long as they are cooked properly and taste nice, it really doesn't have to be that complicated.
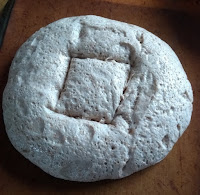
Following a recipe, I tend to end up with a sticky sloppy un-handleable dough, that won't hold it's shape at all - here is one of my early efforts, spreading happily across the baking tray! Instead I've developed my own sense of what the dough should feel like and I don't stick too strictly to the water / flour ratios in the recipe.I can't say even now that I have yet achieved a dough that sits proudly in a loaf shape without flopping - but if I take it straight out of an overnight proof in the fridge, and finagle it into a hot 'dutch oven' that doesn't seem to matter . . .I'm regularly now getting an attractive and tasty looking loaf with this approach. Pittas, soft rolls, teacakes, pizza bases, naan, stollen, scones and even cookies are all coming out really well too.
Equipment-wise I don't have anything fancy - except for an old Le Creuset. I don't use a mixer - in fact I don't get my hands on the dough at all until I have to, using a spoon to mix everything initially, and a heavy rubber spatula after that.In terms of prep:
- Typically, I'll get my starter out of the fridge, give it a spoon of flour to get it a bit more 'active' (leaving it maybe a couple of hours), and then start my dough from there. I don't monitor it to see if it is at the top of its rise, or floats in a glass of water or anything like that. [I don't 'discard' - typically I'll bake once or twice a week - feeding my starter afterwards with equal quantities of flour / water in line with the amount used - I'll let it rise a bit after feeding, before returning it to the fridge.]
- I think I do 'autolyse' - where you mix the starter, some of the flour and water to a paste, and leave it for an hour before mixing in the rest of the ingredients.
- Once it is all brought together, I'll use my spatula to fold the sides in (with the addition of small amounts of flour as necessary), until I get a firm, smooth, not too sticky looking dough. I leave it then in a metal bowl, with a disposable shower cap over the top.
- When I remember, I'll return to it, and use my spatula to fold the sides back in and turn it over.
- Sometimes (if I start early enough) I may be baking rolls, pittas or teacakes later in the afternoon (if the dough has risen well and feels ready) - for a loaf, it will typically spend the night proofing further in the fridge. This is about recognising when the dough is 'done' rather than particular timings.
- For a loaf, I'll transfer it straight from the fridge onto a sheet of baking paper, and into my pre-heated cast iron pot - use some scissors or a sharp knife to score an admittedly ragged line across the top (stops a major air bubble forming) then into a hot oven (220C) for 25 minutes with the lid on, and 25 minutes (at 190C) with the lid off . . . eh, voila!
The final - and hardest - lesson is not to cut into it when it is hot - as it is still cooking 😋
So there we go - 'simple sourdough' - I know I've got more to learn, and the results are by no means perfect, but this is working for me!


No comments:
Post a Comment